
Body
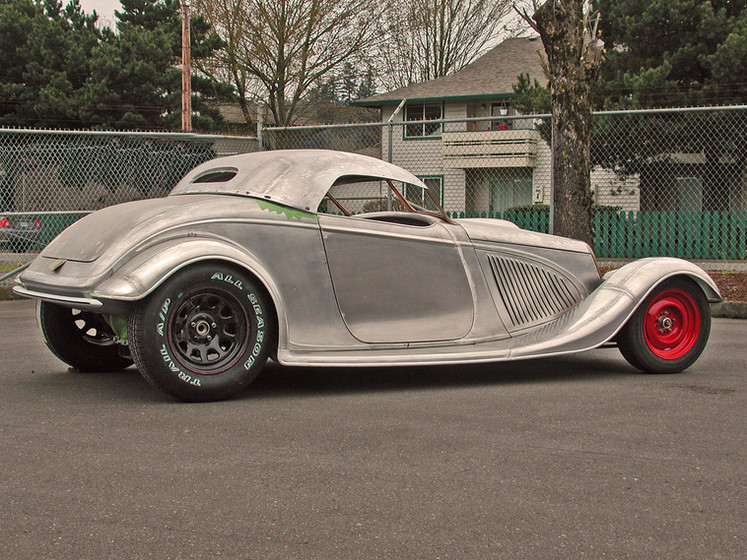
All body panels were fabricated from flat sheets of .063 3003 aluminum. Basic body shapes such as, quarter panels, cowl sides, cowl top, firewall, garnish reveals, inner and outer rockers, upper and lower trunk panels, doors and deck lid were formed using a combination of large Yoder power hammers, a Pullmax and small but effective planishing hammers. All of these tools are nearly a century old. Decades older than the guys using them.
The major panels were then hung on a body buck and welded together to create a complete shell. Each seam was fit, hammer welded and metal finished. The body buck was built over the template for the frame so that the suspension system and drive train would fit properly. This arrangement set the width, length and height of the finished body.
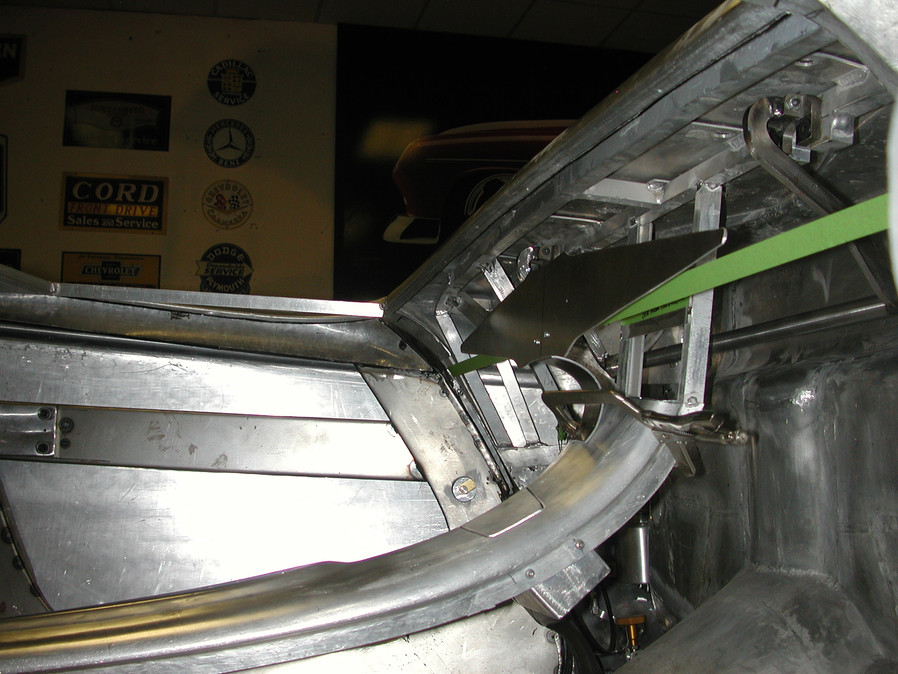
Door jambs, inner rockers, seat surrounds, the console and a trunk jamb were created to help place an inner structure or roll cage so the body could support itself and allow door, trunk and hood hinges a solid mounting position. An inner floor was created to link the firewall, rockers, quarters, wheel wells and roll pan together. An outer floor was then fabricated and bonded to the inner floor. The outer floor utilized recessed panels that align with the frame tubing on the underside of the car.
All hinges for doors, deck and hood were engineered and custom fabricated to fit this car. The deck lid hinges are electrically powered. The hood hinges utilize hidden hydraulic rams that hold the hood open. The door hinges are large single units that are adjustable using heim joints. This arrangement is set up so that the swing angle does not allow the doors to droop as they open.


1933 Renaissance Roadster
The car returned to the surface plate after construction of the chassis. All critical measurements were checked and confirmed to make sure the car was level and square. Fender shapes were then roughed out of foam. When the shape was finalized wooden station bucks were created. One section of the fender was shaped from .063 aluminum and fitted to the buck and foam until the shape was correct. The process was repeated until the fender was complete. The buck was disassembled and reassembled so the opposite side could be constructed.
The process was repeated for the rear fenders and the running boards. Mounting points were established for all 6 parts along with flanges to fasten the running boards to the fenders. At this point the outer beads and edges were marked and formed into the fenders and running boards. This included a rolled and wire formed edge.
Braces were created from 19 gauge steel in a "V" pattern. Each front fender uses 2. One over the top to the outer edge and a shorter version for the headlights. They were blended seamlessly into the underside of the front fenders. The remainder of the bracing was hidden in the flanges between the fenders and the running boards. Each mounting flange surface was blended into each fender and running board to create a continuous flow and allow space for recessed fasteners.


Fenders
The hood was fabricated from 063 aluminum sheet. Fortunately the hood sides and grille shell were already in place. The skin was shaped first and fit to the surrounding components. The scoop "bubble" was formed and fitted to the hood skin. The next step entailed hammer welding the scoop to the skin and metal finishing the area before the edges are welded in place.
When the skin is complete, an inner perimeter structure was fabricated and fit to the grille shell, hood sides, cowl, and firewall. The inner structure will keep the hood in position at all times and provides an excellent foundation for hinges and latching. To finish the inside surfaces surrounding the perimeter an aluminum "liner" is formed, fit, and bonded to the inside of the hood. The scoop bezel is "roughed" in using steel this time. It will be final fit to the opening when the hood is ready for final paint.


Hood


Dash
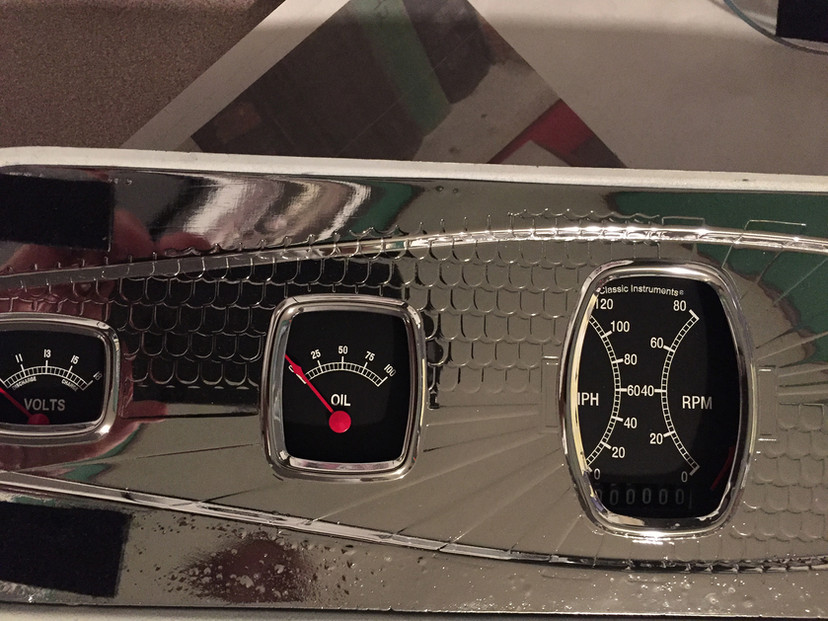
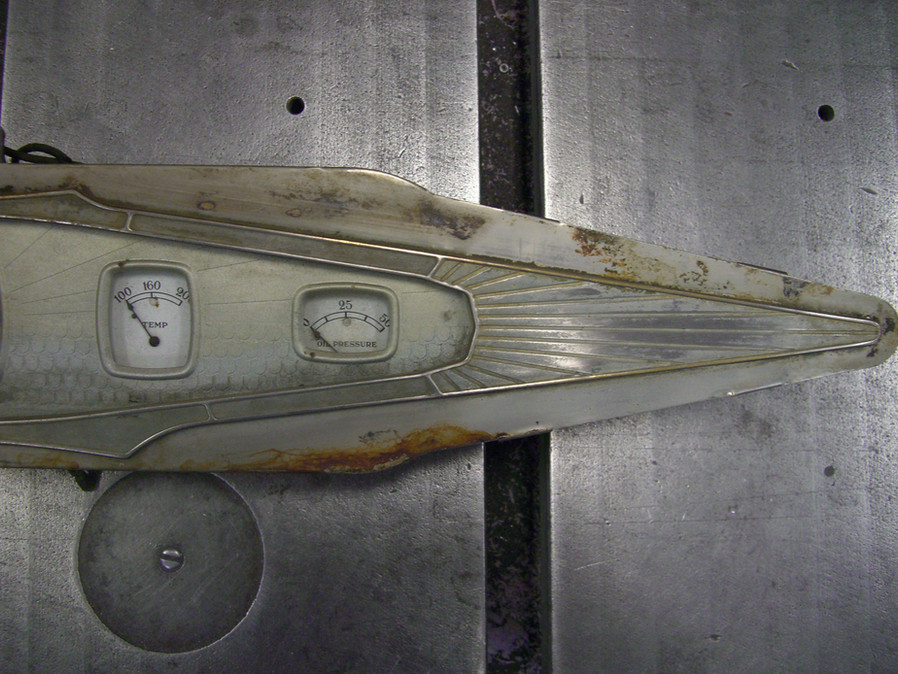
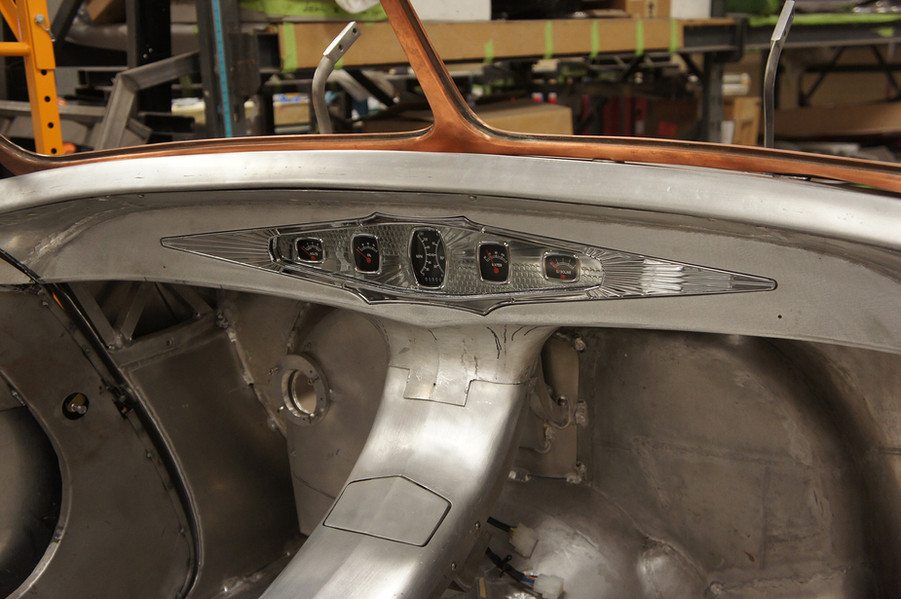
The dash is an interesting combination of old and new. This project began when an original instrument cluster from a 1930 Nash was selected for use in the car. The height and length fit the space nicely. The surprise came when the cluster bezel was set in position over the center console. The lower bezel edge shape perfectly complemented the crown of the console.
The position was mocked up using foam and the dash shaped to fit. A step edge was used to allow upholstery panels to fit flush. The corners were curved to align with the door garnish to allow the shape to flow through without interruption.
Classic Instruments restored and modernized the gauges. S.A.R. painted the recessed "deco pattern" to match the body color.
The base column was fabricated in house by S.A.R. The joints and shafts are hidden within the sheet metal. The lower shaft, u-joint and steering rack are covered and blend into the frame and lower radiator tank
The column drop and steering wheel were designed to be one continuous shape. A full size column drop was made for the machinist to use as design reference. The steering wheel was first laid out on paper, then illustrated in photoshop and everything was sent to the machinist.
Using computer modelling, the steering wheel took shape. All parameters of construction and design were taken into account prior to the actual machine work. The steering wheel was cut from a 16"x16"x16" block of aluminum billet.


Steering Wheel
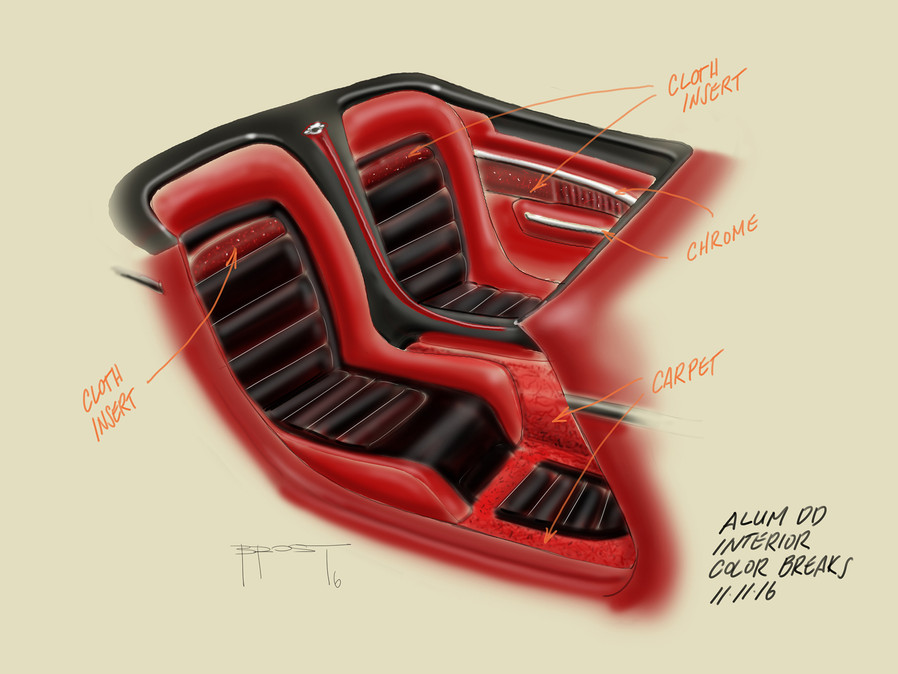
When the sheet metal surrounding the interior was nearing completion, the interior design lay out could be finalized. Door panels were the first project to be fabricated in house. An English wheel was used to form the aluminum sheet to the curve of the doors. Wood arm rest bucks were then shaped by hand to fit and attached to the panel.
The interior door handle is used as the central point of both chrome trim parts. The arm rest trim was hand formed from steel. Door panel trim was machined from aluminum, using a mock up as a template.
Seat frames were constructed out of aluminum and wood. They bolt to the body substructure. The foam is then hand shaped within the aluminum perimeter to create a ring that will be covered in leather. The cushions will follow the same method and can be removed to access the electrical panels behind the seats.
The usual convenience controls are hidden and placed in secluded locations. The start and headlight switches are placed in a flush panel on the left side of the console. The master power, e-brake, trunk and top buttons are located in the same panel. A custom etched bezel is marked for ease of use. The hood release handle will be found in the driver's side door jamb.


Interior
When the sheet metal surrounding the interior was nearing completion, the interior design lay out could he finalized. Door panels were the first project to be fabricated in house: An English wheel was used to form the aluminum sheet to the curve of the doors. Wood arm rest bucks were then shaped by hand to fit and attached to the panel.
The interior door handle is used as the central point of both chrome trim parts. The arm rest trim was hand formed from steel. Door panel trim was machined from aluminum, using a mock up as a template.
Seat frames were constructed out of aluminum and wood. They bolt to the body substructure. The foam is then hand shaped within the aluminum perimeter to create a ring that will be covered in leather. The cushions will follow the same method and can be removed to access the electrical panels behind the seats.
The usual convenience controls are hidden and placed in secluded locations. The start and headlight switches are placed in a flush panel on the left side of the console. The master power, e-brake, trunk and top buttons are located in the same panel. A custom etched bezel is marked for ease of use. The hood release handle will be found in the driver's side door jamb


Trunk
The hand formed aluminum top was created using the same system as the fender fabrication. When the top was structurally sound an inner liner was fabricated to finish the inside much like a headliner.
Side trim was hand formed out of steel, welded and metal finished. There are only 2 halves with a single part line below the centerline of the rear window. The outer rear window frame was also hand built out of steel. A light weight version was needed for the inside. The steel outer frame was scanned by computer and CNC machined out of aluminum.
The dome lights are from an early '30s Cadillac. The contact and ground were built into the top latch pin. The "art deco" motifs on the ends of the dome light bezels are the inspiration for the art deco themed parts on the car.


Hard Top
This part of the process is one of the most critical to any car build. The sheet metal fabrication fit and finish is certainly the foundation, but it is the block sanding and the attention to straight panels, crisp edges and perfectly gapped part lines that really make the difference. Additionally, extra effort needs to be made at each step in the process to ensure excellent adhesion between all substrates.
As the last coats of the final primer are sanded, plans are under way to set up the parts for the complex 2 color candy top coats. Consistency in color and tone are an absolute must.
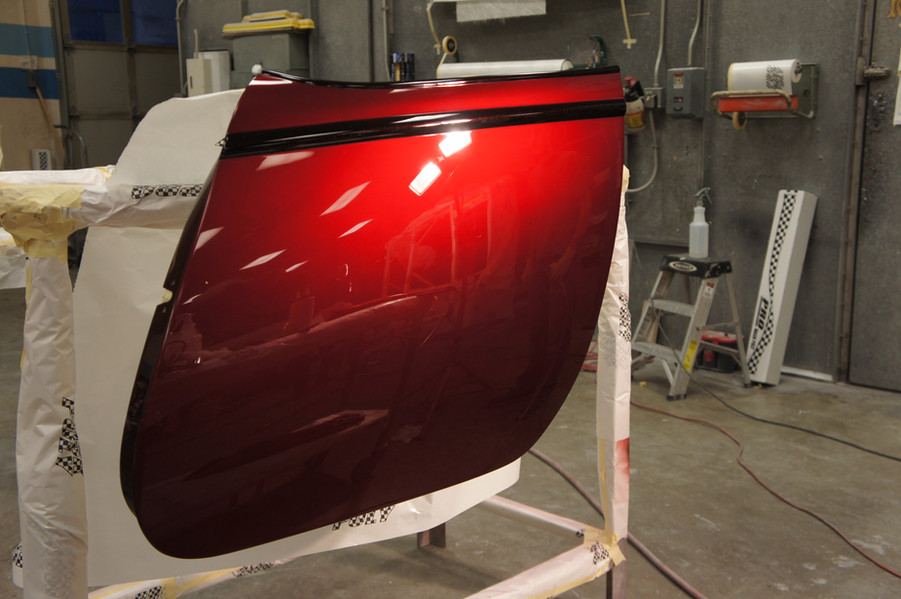
The deep red is sprayed first beginning with 4 coats of "ground" color, followed by 4 coats of translucent red candy. Each coat must be managed carefully so that the exact same amount of paint is sprayed on each part. A few coats of clear are applied, then sanded masked prior to the darker color to be sprayed.
The custom mix "old school" dark red wine candy starts with 4 coats of black metallic followed by 4 coats of dark red candy with crushed glass. A few coats of clear are sprayed over the dark candy and when cured it is sanded prior to an application of 6 final coats of straight clear. The entire part is then color sanded to 2000 grit before polish.
The frame was treated much the same way. Every surface was smoothed and all transitions between tubes blended. The frame was painted in the dark red wine candy and the entire frame was color sanded in 2000 grit and polished, much of it by hand.


Prime & Paint
When the sheet metal surrounding the interior was nearing completion, the interior design lay out could he finalized. Door panels were the first project to be fabricated in house: An English wheel was used to form the aluminum sheet to the curve of the doors. Wood arm rest bucks were then shaped by hand to fit and attached to the panel.
The interior door handle is used as the central point of both chrome trim parts. The arm rest trim was hand formed from steel. Door panel trim was machined from aluminum, using a mock up as a template.
Seat frames were constructed out of aluminum and wood. They bolt to the body substructure. The foam is then hand shaped within the aluminum perimeter to create a ring that will be covered in leather. The cushions will follow the same method and can be removed to access the electrical panels behind the seats.
The usual convenience controls are hidden and placed in secluded locations. The start and headlight switches are placed in a flush panel on the left side of the console. The master power, e-brake, trunk and top buttons are located in the same panel. A custom etched bezel is marked for ease of use. The hood release handle will be found in the driver's side door jamb.


Headlights


